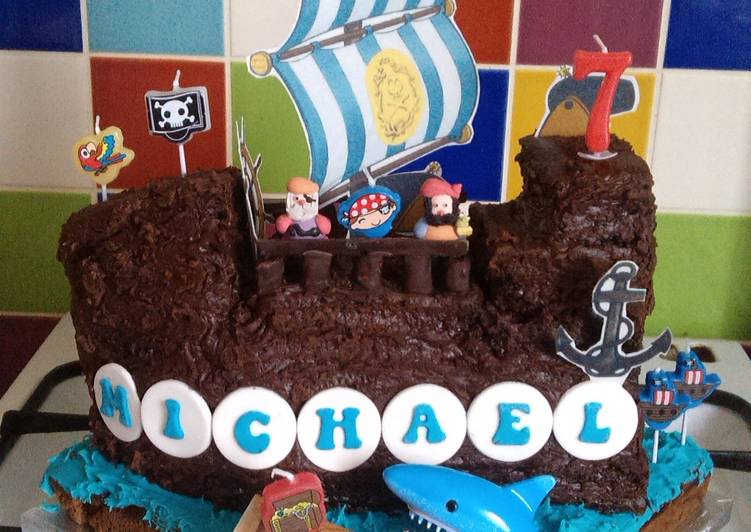
Hello everybody, it is me, Dave, welcome to my recipe site. Today, I’m gonna show you how to prepare a special dish, vickys pirate galleon cake!. It is one of my favorites. For mine, I will make it a little bit unique. This will be really delicious.
This lengthy tutorial is jam packed with full of tips and techniques like how to make realistic sails, how to create a wooden texture, how to create the decorative balustrades, how to make the ocean waves. It is a very easy cake to make and effective. Lucky he asked for it again.
Vickys Pirate Galleon Cake! is one of the most favored of current trending meals on earth. It is easy, it’s fast, it tastes yummy. It is enjoyed by millions every day. They are nice and they look wonderful. Vickys Pirate Galleon Cake! is something that I’ve loved my entire life.
To begin with this particular recipe, we must first prepare a few ingredients. You can have vickys pirate galleon cake! using 7 ingredients and 14 steps. Here is how you cook it.
The ingredients needed to make Vickys Pirate Galleon Cake!:
- Get 3 single layer 10" squares of your favourite carvable cake recipe
- Take 1 lb vanilla buttercream frosting, coloured blue
- Get 1 lb chocolate buttercream frosting
- Prepare wooden skewers to hold the cake together
- Take 100 grams chocolate bar
- Prepare mini marshmallows
- Prepare any embellishments you like! I used a mixture of store bought fondant figures, themed candles, wafer/rice paper standing toppers and plastic toys
The galleon was an evolution of the caravel and carrack. Most relevant Best selling Latest uploads. Vintage illustration fairy tales story book travel and transportation drawing of an eighteenth century seventy four gun ship sailing on the seven seas. A buccaneer pirate galleon on gentle ocean waves.
Steps to make Vickys Pirate Galleon Cake!:
- I used my favourite chocolate cake recipe for this. I baked 3 whole batches, 1 batch per tin and it baked at the same temp for around 35 minutes in the 10" square tin - - https://cookpad.com/us/recipes/333461-vickys-best-ever-chocolate-cake-w-secret-avocado-gf-df-ef-sf-nf
- One of your squares is for the cake base. Slap the blue frosting over the top and sides. Don't be too neat with it, it looks like choppy waves if you're a bit rough with it. Put it aside
- The other 2 squares need sliced in half
- Carve the top of each of the 4 rectangles you have to shape the bow of the boat
- Level off 2 of the shapes if necessary then using a thin layer of chocolate buttercream, sandwich one layer on top of another
- Repeat for one of the other layers. Spread the top of what you've just constructed with a thin layer of frosting and put the next whole layer on top. You now have 3 whole layers stacked on top of each other
- The last boat shape you have left needs to be divided into pieces. (I got overexcited and cut 2 of my layers but you only need 1 cut up. The first cut is where the front triangle meets the rectangle, so the bow shape at the front. Then the rest of the rectangle you're left with needs cut into 3 pieces. So imagine my picture, where the square is in the middle, also cut in half and the thinner end piece makes the 3rd bit
- Now I must apologise for the lack of pictures for the assembly of these pieces. What you need to do is put a thin layer of chocolate buttercream over the top of the 3rd whole layer of the boat shape you've got going
- Now stick the front triangle on top of the other triangle shapes and stick one half of the middle square you halved onto the back for the stern. Coat the stern piece you've just stuck on with frosting on top then stick on top the thin end piece which should be half as wide as the piece under it. The remaining piece is your treat! We don't need it so enjoy! Now coat the whole of the ship with the remaining chocolate frosting
- I used wooden kebab skewers cut to size to hold the cut pieces on, so I put 2 through the back step on each side and 3 through the front triangle to keep it in place
- As you can see, I was quite slapdash with frosting the ship. My plan was to smooth it down and use a toothpick to mark out wooden planks to make the ship look nice but I didn't have any room in the freezer to chill the cake before I started decorating and the more I spread the frosting the more cake came away with it. Nevermind, you'll make a better job I'm sure
- Now employ an extra pair of hands and place the ship on top of the sea! The frosting is easily fixed after it's been lifted and stick on anything that needs to go on the cake side before the frosting dries
- Next I melted around 50g of dark chocolate in the microwave and when it was room temp I tossed some mini marshmallows in it. I stuck them on the sides of the deck and used 2 strips of the bar that was leftover to finish off the railings
- Now you can add any decoration you like. I got edible wafer sails, cannons, ships wheel, anchor and map from ebay for a couple of bucks. I got the fondant pirates from the local craft bakers and the candles from the supermarket. The shark was an old toy of the boys!
Download Pirate galleon stock vectors at the best vector graphic agency with millions of premium high quality, royalty-free stock vectors, illustrations and cliparts at reasonable prices. A pirate is someone who takes over a ship that does not belong to them. Pirates often sailed in stolen ships across the world's oceans, stealing other. A wide variety of pirate galleon options are available to you, such as use, style, and material. L??yd?? HD-arkistokuvia ja miljoonia muita rojaltivapaita arkistovalokuvia, -kuvituskuvia ja -vektoreita Shutterstockin kokoelmasta hakusanalla pirate galleon.
So that’s going to wrap it up for this exceptional food vickys pirate galleon cake! recipe. Thanks so much for your time. I am confident that you can make this at home. There’s gonna be more interesting food at home recipes coming up. Don’t forget to save this page on your browser, and share it to your family, colleague and friends. Thanks again for reading. Go on get cooking!